
An estate cleanout can feel overwhelming, especially when you’re trying to make sure nothing important gets missed. That’s why an estate cleanout checklist can make the process so much easier. A few simple estate cleanout steps can help you stay organized and move through the job with less stress, rather than trying to figure everything out as you go. And by making sure that all of these steps are followed, you can significantly reduce the chances of leaving any important valuables behind. Check out our checklist for estate cleanouts below.
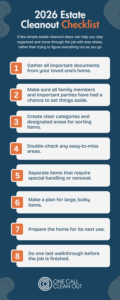
Estate Cleanout Step 1: Gather All Important Documents From Your Loved One’s Home
Before the estate cleanout begins, take out any important documents, such as wills, deeds, financial paperwork, insurance documents, IDs, photos, and family records. These are items that are crucial to the entire estate settling process, and forgetting this could have huge ramifications. If you are wondering how to clean out an estate, this is one of the most important first steps that you’ll want to make sure is taken care of.
Estate Cleanout Step 2: Make Sure Multiple Family Members Have Gotten to Walk Around the Property
Before the cleanout starts, make sure those who should have input have had a chance to walk through the home. This helps avoid confusion down the road and cuts down on the likelihood that someone will say an important item was taken out too early. Making sure everyone involved has had the opportunity to point out sentimental items, valuables, or belongings they may want to keep is one of the best things to do during an estate cleanout.
Estate Cleanout Step 3: Make Clear Categories For Sorting Items
A simple labeling system makes the cleanout that much easier. Use categories such as “keep,” “donate,” “sell,” “throw away,” and “ask first.” Clear labels are among the easiest estate cleanout steps to take because they keep everyone on the same page. This eliminates confusion and makes sure that every item goes where it is supposed to.
Estate Cleanout Step 4: Double-Check Any Easy-To-Miss Areas
One thing you’re going to want to make sure you have on your estate cleanout checklist are the places people forget about. Check the dresser drawers, closets, medicine cabinets, attic corners, basement shelves, garage cabinets, storage bins, and outdoor sheds. Often important paperwork, jewelry, keepsakes, and other small valuables are tucked away in places that are not checked until the very end.
Estate Cleanout Step 5: Separate Items That Need Special Handling
Some belongings don’t belong sorted in with the rest of the cleanout. Family heirlooms, photographs, legal documents, firearms, chemicals, and some valuables should be separated early for proper handling. This is an important part of the estate cleanout process because it helps to protect meaningful items and makes the process safer and more organized.
Estate Cleanout Step 6: Make A Plan For Large Items
Large furniture, appliances, mattresses, and other large objects can slow an estate cleanout down quickly. One of the most practical estate cleanout tips is to decide in advance how those bulky items will be removed. A plan for the heavy lifting makes the cleanout run smoother and prevents the job from becoming more physically taxing than necessary.
Estate Cleanout Step 7: Prepare The Home For Its Next Use
Once the personal belongings and other items are out, think about what needs to happen next. The home may be getting sold, transferred to a family member, cleaned for move-in, or prepared for further work. An effective estate cleanout should include making sure the property is left in a condition that supports whatever comes next, whatever that looks like.
Estate Cleanout Step 8: Do One Last Walkthrough Before Job is Finished
Do one last complete walk-through of the property before the cleanout is complete. This lets you make sure nothing important was missed, nothing was left by accident, and the home is ready for its next step. Final walkthroughs are one of the easiest estate cleanout steps to miss but can save a lot of regret later.
Sounds Overwhelming? Hire a Professional Estate Cleanout Company to Take On the Work
Sometimes the best answer to how to clean out an estate is to work with the pros. One Call Clean Out can help with the heavy lifting, junk removal, and full estate cleanout so your family can focus on the important decisions without being overwhelmed with the physical work.
It makes the whole process a lot easier to have a professional crew working with you, especially if there’s large furniture, appliances, years of stored belongings, or multiple rooms to clear out in the estate. Rather than trying to manage each step yourself, you can count on a team that knows how to keep a cleanout organized, efficient, and respectful all the way through.
At One Call Clean Out, we understand that estate cleanouts are about more than just getting rid of “stuff”. They often happen during emotional seasons of life, and our goal is to help make the process easier on your family while making sure the property is ready for whatever comes next. If you’re looking for help getting through an estate cleanout with less stress and more support, reach out to One Call Clean Out today.